Some basics before we get into techniques: A brush is NOT a pen or a pencil, you hold it in your hand so you can get the job done sometimes that means being able to roll it in your fingers or scrub away. We also use all surfaces of the brush not just the tip or end of the brush, this goes for all brushes whether they are flat or round, bristle or sable though I don’t recommend using your sable brushes to do any scrubbing where you are really abusing the brush. It is also good practice to hole the brush back at least mid way and better yet to hold it at the end not up by the metal ferrule, this will give you brush more action and your painting won’t look as tight. Save that for the final details.
Also, keep your brush relatively dry. If you rinse it, wipe it out with a paper towel to get rid of any excess water which can flow down off your brush and thin your paint so that it won’t cover the way you thought it would.
Brush strokes matter. They can tell your viewer a lot about the texture or the terrain even the direction or the shape of something, think about what you are painting and what you can do to make it look more authentic.

Dry Brush – of all the strokes, this one is probably the most used to get the type of blending we need to do in acrylics, it is well worth the practice. Key things to remember are: Dry Brush means DRY BRUSH! If you rinse your brush be sure you have dried the brush so there is no water visible when you squeeze the bristles, water will hide up near the metal ferrule so be sure to dry the whole bristle area. It also means that there is little paint on those dry bristles so after you load your brush be sure that there are no globs of paint on the ends or sides, wipe it on a paper towel if you have to, to avoid having too much paint.
The other thing to keep in mind is pressure. If you press down hard on your brush, more paint will come off and fill in the area, the lighter you press down, the brush will only hit the high spots on the canvas leaving little “holes” so you can see the under painting showing through.
Depending on what you are painting at the time dry brush can be used to scrub in some color with a scumbling (every-which-way) stroke, circular if you are doing clouds, mist or dust, when you are making waterfalls or the glimmer on the ocean.

Stippling – This is a good stroke when you are leafing out trees or creating bushes or distant flowers or even adding some texture, the pressure rule applies here as well but you can have more paint on your brush.
I use a flat bristle brush for this technique. When I pick up paint I take my brush, on my palette I tap the end of my brush straight down on the mixing area, not so much to mix the paint if I have more than one color but more to “fuzz up” the end of the brush so it spreads out and looks all twisted, this is great for trees and bushes because it creates a random look to the area. I apply the paint by touching the end of the brush straight on to create the tree or bush or texture I need. Remember that the amount of pressure you use on your brush will determine how much paint comes off your brush. If the area is too congested with paint, you are too heavy handed. I have literally had the brush fall out of my hand because I was holding it so lightly when doing this technique.

Impasto – This is an oil technique but it can give you a very impressionistic look, I will give some advice here: the more you fiddle with it the muddier it will become, this is one of those techniques where you put the paint down and leave it alone. You can use either sable or bristle brushes because there will be no scrubbing, you scoop up the paint – there will be globs – and you lay it on your canvas almost like using a trowel. This can also be done with a palette knife. Just put it down and only lightly blend the next color into it. You might want to use an extender or the new “Open” acrylics to give you more time to work the paint o you can blend by gently mixing the colors on the canvas, just don’t over mix or you will get mud.

Scumbling – This is just a bunch of strokes that go any which way you can make your brush go. You can use this doing dry brush or impasto or anywhere in-between. This is a great stroke when you are under painting areas with lots of rocks or rocky cliffs because the visual movement that is left will give the viewer the sense of the jumble of rocks because of the texture. I like to mix my colors as I go on the canvas when doing scumbling because that will enhance the movement and the texture.

“U” shaped strokes – This is a very good stroke when you are under painting things with texture like dirt, snow or water. When I say “U” what I mean is that the strokes go up on the ends. The closer together the ends of the strokes the rougher the texture; the longer and flatter the strokes, the smoother the texture will look. You can use this stroke if you are using a lot of paint in your under painting or use it with a dry brush if you are highlighting. The basic “U” shape can look like a dip or a pit in the dirt or snow, for instance, if you turn that “U” over, it can become a rise or a hump so you can create different terrain just by changing up your stroke.

“X” Strokes – This is another very useful stroke when you need to get an area covered, I use it a lot when I am doing my skies with the hake brush. The Hake or blender brush has very soft hairs so if you are soft enough with your stroke, using the big “X”s with this brush you can create soft blends that almost look like airbrush. It does that practice because you barely touch the canvas – “Three hairs and some air” as the late Bob Ross would say – and most beginners are a bit heavy handed in most of what they do.
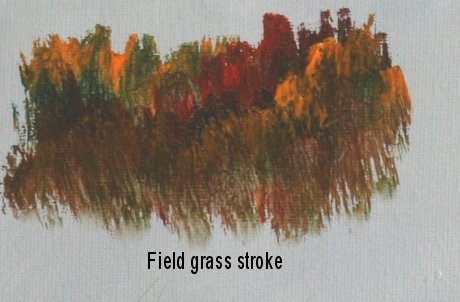
I’m not sure what to call this next stroke but it is great when you are doing a large field of grass. I usually use a flat bristle brush for this but a flat sable will work, I don’t think a round brush would be very affective.
First I load my brush with a lot of paint, next I hold the flat side of my brush almost parallel to the canvas then pat, push and lift the brush, it is almost a scooping motion. If you are doing it right, you should get fuzzy edges and a lot of texture. I like to blend in other colors using this stroke in my grassy areas so that I can see the different colors I have used. This gives a very textured look when done but you will need to reload often so that the paint will leave little peaks when you lift the brush.

Flat or Round Sable brush - You can create leaf shapes by loading your brush with a good amount of paint but it should be worked into the bristles then start by touching the edge (flat brush) or the end (round brush) then as you move the brush press and twist then twist and lift to finish. You can create all shapes of leaves and grasses using this stroke but it does take some practice.

The Liner Brush – This little brush makes great trees, branches, weeds, grass, fence wire, boat rigging…Any where you need a nice thin line the liner is the brush to use. It does take practice to master and mixing the right consistency of your paint is half the battle. The paint needs to be very ink-like. If you tip your palette it should run. Next you need to load it fully, really work the paint into your brush and as you lift it off your palette, roll it in your fingers.
Hold this brush as far back on the handle as you can and hold the tip slightly down so the paint will flow. If you are doing trees or branches, the harder you press the thicker the line, lift as you come up to get a thinner line and wiggle your brush a little to give the tree/branch/weed some character.
 When doing grass, get your hand and brush moving in a circular motion before you get to the canvas, when you get the rhythm, touch the canvas on the upstroke. Big circles = tall grass, little circles – short grass.
These are just some basic strokes that should keep you busy. You will use all or most of them in almost every painting and many of these can be used in other media such as oils and even watercolor. Once they become part of you, through practice and experience, you will use them without thinking that is when you are painting for the art. Good luck and happy painting.
